Decentralized Applications (DApps)
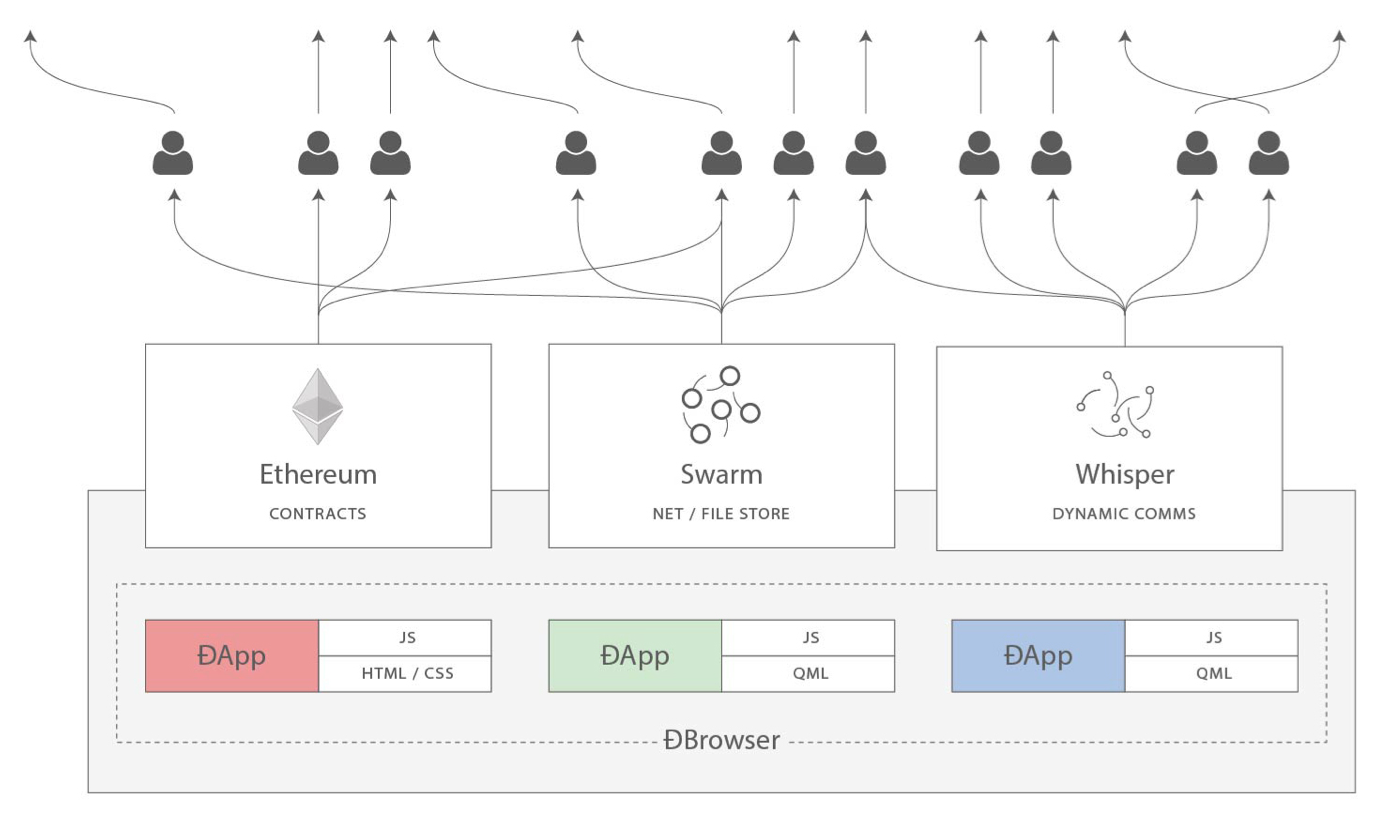
In this chapter we will explore the world of decentralized applications, or DApps. From the early days of Ethereum, the founders' vision was much broader than "smart contracts": no less than reinventing the web and creating a new world of DApps, aptly called web3. Smart contracts are a way to decentralize the controlling logic and payment functions of applications. Web3 DApps are about decentralizing all other aspects of an application: storage, messaging, naming, etc. (see Web3: A decentralized web using smart contracts and P2P technologies).
Figure 1. Web3: A decentralized web using smart contracts and P2P technologies
|
Warning
|
While "decentralized apps" are an audacious vision of the future, the term "DApp" is often applied to any smart contract with a web frontend. Some of these so-called DApps are highly centralized applications (CApps?). Beware of false DApps! |
In this chapter we will develop and deploy a sample DApp: an auction platform. You can find the source code in the book’s repository under code/auction_dapp. We will look at each aspect of an auction application and see how we can decentralize the application as much as possible. First, though, let’s take a closer look at the defining characteristics and advantages of DApps.
What Is a DApp?
A DApp is an application that is mostly or entirely decentralized.
Consider all the possible aspects of an application that may be decentralized:
-
Backend software (application logic)
-
Frontend software
-
Data storage
-
Message communications
-
Name resolution
Each of these can be somewhat centralized or somewhat decentralized. For example, a frontend can be developed as a web app that runs on a centralized server, or as a mobile app that runs on your device. The backend and storage can be on private servers and proprietary databases, or you can use a smart contract and P2P storage.
There are many advantages to creating a DApp that a typical centralized architecture cannot provide:
- Resiliency
-
Because the business logic is controlled by a smart contract, a DApp backend will be fully distributed and managed on a blockchain platform. Unlike an application deployed on a centralized server, a DApp will have no downtime and will continue to be available as long as the platform is still operating.
- Transparency
-
The on-chain nature of a DApp allows everyone to inspect the code and be more sure about its function. Any interaction with the DApp will be stored forever in the blockchain.
- Censorship resistance
-
As long as a user has access to an Ethereum node (running one if necessary), the user will always be able to interact with a DApp without interference from any centralized control. No service provider, or even the owner of the smart contract, can alter the code once it is deployed on the network.
In the Ethereum ecosystem as it stands today, there are very few truly decentralized apps—most still rely on centralized services and servers for some part of their operation. In the future, we expect that it will be possible for every part of any DApp to be operated in a fully decentralized way.
Backend (Smart Contract)
In a DApp, smart contracts are used to store the business logic (program code) and the related state of your application. You can think of a smart contract replacing a server-side (aka "backend") component in a regular application. This is an oversimplification, of course. One of the main differences is that any computation executed in a smart contract is very expensive and so should be kept as minimal as possible. It is therefore important to identify which aspects of the application need a trusted and decentralized execution platform.
Ethereum smart contracts allow you to build architectures in which a network of smart contracts call and pass data between each other, reading and writing their own state variables as they go, with their complexity restricted only by the block gas limit. After you deploy your smart contract, your business logic could well be used by many other developers in the future.
One major consideration of smart contract architecture design is the inability to change the code of a smart contract once it is deployed. It can be deleted if it is programmed with an accessible SELFDESTRUCT opcode, but other than complete removal, the code cannot be changed in any way.
The second major consideration of smart contract architecture design is DApp size. A really large monolithic smart contract may cost a lot of gas to deploy and use. Therefore, some applications may choose to have off-chain computation and an external data source. Keep in mind, however, that having the core business logic of the DApp be dependent on external data (e.g., from a centralized server) means your users will have to trust these external resources.
Frontend (Web User Interface)
Unlike the business logic of the DApp, which requires a developer to understand the EVM and new languages such as Solidity, the client-side interface of a DApp can use standard web technologies (HTML, CSS, JavaScript, etc.). This allows a traditional web developer to use familiar tools, libraries, and frameworks. Interactions with Ethereum, such as signing messages, sending transactions, and managing keys, are often conducted through the web browser, via an extension such as MetaMask (see [intro_chapter]).
Although it is possible to create a mobile DApp as well, currently there are few resources to help create mobile DApp frontends, mainly due to the lack of mobile clients that can serve as a light client with key-management functionality.
The frontend is usually linked to Ethereum via the web3.js JavaScript library, which is bundled with the frontend resources and served to a browser by a web server.
Data Storage
Due to high gas costs and the currently low block gas limit, smart contracts are not well suited to storing or processing large amounts of data. Hence, most DApps utilize off-chain data storage services, meaning they store the bulky data off the Ethereum chain, on a data storage platform. That data storage platform can be centralized (for example, a typical cloud database), or the data can be decentralized, stored on a P2P platform such as the IPFS, or Ethereum’s own Swarm platform.
Decentralized P2P storage is ideal for storing and distributing large static assets such as images, videos, and the resources of the application’s frontend web interface (HTML, CSS, JavaScript, etc.). We’ll look at a few of the options next.
IPFS
The Inter-Planetary File System (IPFS) is a decentralized content-addressable storage system that distributes stored objects among peers in a P2P network. "Content addressable" means that each piece of content (file) is hashed and the hash is used to identify that file. You can then retrieve any file from any IPFS node by requesting it by its hash.
IPFS aims to replace HTTP as the protocol of choice for delivery of web applications. Instead of storing a web application on a single server, the files are stored on IPFS and can be retrieved from any IPFS node.
More information about IPFS can be found at https://ipfs.io.
Swarm
Swarm is another content-addressable P2P storage system, similar to IPFS. Swarm was created by the Ethereum Foundation, as part of the Go-Ethereum suite of tools. Like IPFS, it allows you to store files that get disseminated and replicated by Swarm nodes. You can access any Swarm file by referring to it by a hash. Swarm allows you to access a website from a decentralized P2P system, instead of a central web server.
The home page for Swarm is itself stored on Swarm and accessible on your Swarm node or a gateway: https://swarm-gateways.net/bzz:/theswarm.eth/.
Decentralized Message Communications Protocols
Another major component of any application is inter-process communication. That means being able to exchange messages between applications, between different instances of the application, or between users of the application. Traditionally, this is achieved by reliance on a centralized server. However, there are a variety of decentralized alternatives to server-based protocols, offering messaging over a P2P network. The most notable P2P messaging protocol for DApps is Whisper, which is part of the Ethereum Foundation’s Go-Ethereum suite of tools.
The final aspect of an application that can be decentralized is name resolution. We’ll take a close look at Ethereum’s name service later in this chapter; now, though, let’s dig into an example.
A Basic DApp Example: Auction DApp
In this section we will start building an example DApp, to explore the various decentralization tools. Our DApp will implement a decentralized auction.
The Auction DApp allows a user to register a "deed" token, which represents some unique asset, such as a house, a car, a trademark, etc. Once a token has been registered, the ownership of the token is transferred to the Auction DApp, allowing it to be listed for sale. The Auction DApp lists each of the registered tokens, allowing other users to place bids. During each auction, users can join a chat room created specifically for that auction. Once an auction is finalized, the deed token ownership is transferred to the winner of the auction.
The overall auction process can be seen in Auction DApp: A simple example auction DApp.
The main components of our Auction DApp are:
-
A smart contract implementing ERC721 non-fungible "deed" tokens (
DeedRepository) -
A smart contract implementing an auction (AuctionRepository) to sell the deeds
-
A web frontend using the Vue/Vuetify JavaScript framework
-
The web3.js library to connect to Ethereum chains (via MetaMask or other clients)
-
A Swarm client, to store resources such as images
-
A Whisper client, to create per-auction chat rooms for all participants
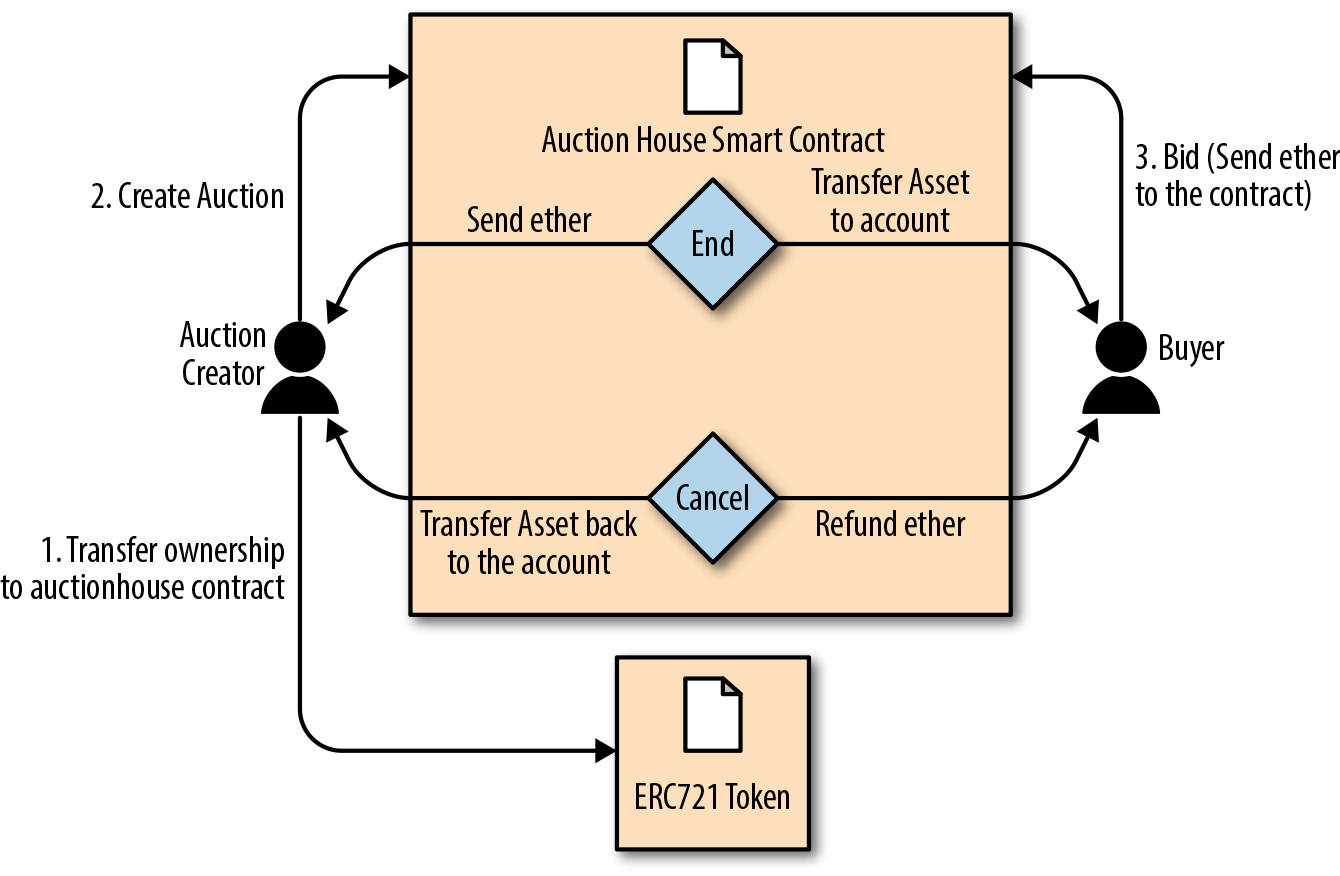
Figure 2. Auction DApp: A simple example auction DApp
You can find the source code for the auction DApp in the book’s repository.
Auction DApp: Backend Smart Contracts
Our Auction DApp example is supported by two smart contracts that we need to deploy on an Ethereum blockchain in order to support the application: AuctionRepository and DeedRepository.
Let’s start by looking at DeedRepository, shown in DeedRepository.sol: An ERC721 deed token for use in an auction. This contract is an ERC721-compatible non-fungible token (see [erc721]).
Example 1. DeedRepository.sol: An ERC721 deed token for use in an auction
link:code/auction_dapp/backend/contracts/DeedRepository.sol[]As you can see, the DeedRepository contract is a straightforward implementation of an ERC721-compatible token.
Our Auction DApp uses the DeedRepository contract to issue and track tokens for each auction. The auction itself is orchestrated by the AuctionRepository contract. This contract is too long to include here in full, but AuctionRepository.sol: The main Auction DApp smart contract shows the main definition of the contract and data structures. The entire contract is available in the book’s GitHub repository.
Example 2. AuctionRepository.sol: The main Auction DApp smart contract
contract AuctionRepository {

    // Array with all auctions
    Auction[] public auctions;

    // Mapping from auction index to user bids
    mapping(uint256 => Bid[]) public auctionBids;

    // Mapping from owner to a list of owned auctions
    mapping(address => uint[]) public auctionOwner;

    // Bid struct to hold bidder and amount
    struct Bid {
        address from;
        uint256 amount;
    }

    // Auction struct which holds all the required info
    struct Auction {
        string name;
        uint256 blockDeadline;
        uint256 startPrice;
        string metadata;
        uint256 deedId;
        address deedRepositoryAddress;
        address owner;
        bool active;
        bool finalized;
    }
The AuctionRepository contract manages all auctions with the following functions:
getCount()
getBidsCount(uint _auctionId)
getAuctionsOf(address _owner)
getCurrentBid(uint _auctionId)
getAuctionsCountOfOwner(address _owner)
getAuctionById(uint _auctionId)
createAuction(address _deedRepositoryAddress, uint256 _deedId,
              string _auctionTitle, string _metadata, uint256 _startPrice,
              uint _blockDeadline)
approveAndTransfer(address _from, address _to, address _deedRepositoryAddress,
                   uint256 _deedId)
cancelAuction(uint _auctionId)
finalizeAuction(uint _auctionId)
bidOnAuction(uint _auctionId)
You can deploy these contracts to the Ethereum blockchain of your choice (e.g., Ropsten) using truffle in the book’s repository:
$ cd code/auction_dapp/backend
$ truffle init
$ truffle compile
$ truffle migrate --network ropsten
DApp governance
If you read through the two smart contracts of the Auction DApp you will notice something important: there is no special account or role that has special privileges over the DApp. Each auction has an owner with some special capabilities, but the Auction DApp itself has no privileged user.
This is a deliberate choice to decentralize the governance of the DApp and relinquish any control once it has been deployed. Some DApps, by comparison, have one or more privileged accounts with special capabilities, such as the ability to terminate the DApp contract, to override or change its configuration, or to "veto" certain operations. Usually, these governance functions are introduced in the DApp in order to avoid unknown problems that might arise due to a bug.
The issue of governance is a particularly difficult one to solve, as it represents a double-edged sword. On the one side, privileged accounts are dangerous; if compromised, they can subvert the security of the DApp. On the other side, without any privileged account, there are no recovery options if a bug is found. We have seen both of these risks manifest in Ethereum DApps. In the case of The DAO ([real_world_example_the_dao] and [ethereum_fork_history]), there were some privileged accounts called the "curators," but they were very limited in their capabilities. Those accounts were not able to override the DAO attacker’s withdrawal of the funds. In a more recent case, the decentralized exchange Bancor experienced a massive theft because a privileged management account was compromised. Turns out, Bancor was not as decentralized as initially assumed.
When building a DApp, you have to decide if you want to make the smart contracts truly independent, launching them and then having no control, or create privileged accounts and run the risk of those being compromised. Either choice carries risk, but in the long run, true DApps cannot have specialized access for privileged accounts—that’s not decentralized.
Auction DApp: Frontend User Interface
Once the Auction DApp’s contracts are deployed, you can interact with them using your favorite JavaScript console and web3.js, or another web3 library. However, most users will need an easy-to-use interface. Our Auction DApp user interface is built using the Vue2/Vuetify JavaScript framework from Google.
You can find the user interface code in the code/auction_dapp/frontend folder in the book’s repository. The directory has the following structure and contents:
frontend/
|-- build
|   |-- build.js
|   |-- check-versions.js
|   |-- logo.png
|   |-- utils.js
|   |-- vue-loader.conf.js
|   |-- webpack.base.conf.js
|   |-- webpack.dev.conf.js
|   `-- webpack.prod.conf.js
|-- config
|   |-- dev.env.js
|   |-- index.js
|   `-- prod.env.js
|-- index.html
|-- package.json
|-- package-lock.json
|-- README.md
|-- src
|   |-- App.vue
|   |-- components
|   |   |-- Auction.vue
|   |   `-- Home.vue
|   |-- config.js
|   |-- contracts
|   |   |-- AuctionRepository.json
|   |   `-- DeedRepository.json
|   |-- main.js
|   |-- models
|   |   |-- AuctionRepository.js
|   |   |-- ChatRoom.js
|   |   `-- DeedRepository.js
|   `-- router
|       `-- index.js
Once you have deployed the contracts, edit the frontend configuration in frontend/src/config.js and enter the addresses of the DeedRepository and AuctionRepository contracts, as deployed. The frontend application also needs access to an Ethereum node offering a JSON-RPC and WebSockets interface. Once you’ve configured the frontend, launch it with a web server on your local machine:
$ npm install
$ npm run dev
The Auction DApp frontend will launch and will be accessible via any web browser at http://localhost:8080.
If all goes well you should see the screen shown in Auction DApp user interface, which illustrates the Auction DApp running in a web browser.
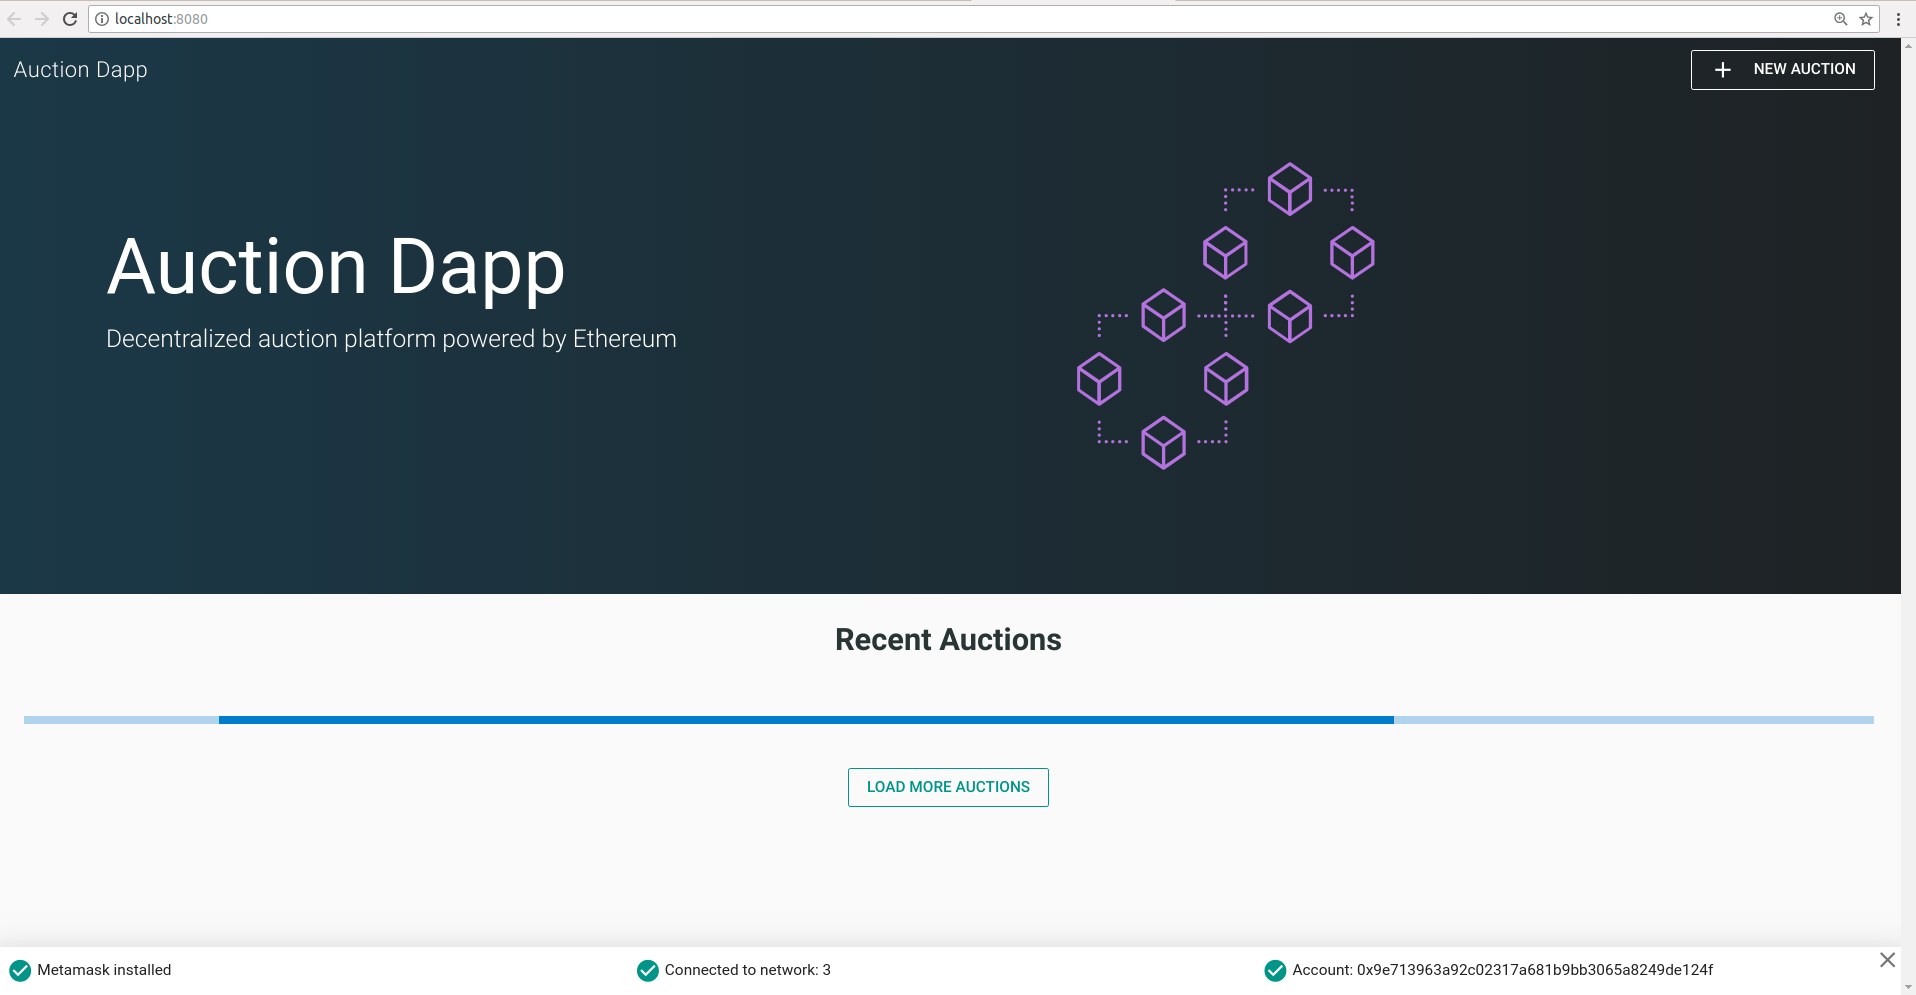
Figure 3. Auction DApp user interface
Further Decentralizing the Auction DApp
Our DApp is already quite decentralized, but we can improve things.
The AuctionRepository contract operates independently of any oversight, open to anyone. Once deployed it cannot be stopped, nor can any auction be controlled. Each auction has a separate chat room that allows anyone to communicate about the auction without censorship or identification. The various auction assets, such as the description and associated image, are stored on Swarm, making them hard to censor or block.
Anyone can interact with the DApp by constructing transactions manually or by running the Vue frontend on their local machine. The DApp code itself is open source and developed collaboratively on a public repository.
There are two things we can do to make this DApp decentralized and resilient:
-
Store all the application code on Swarm or IPFS.
-
Access the DApp by reference to a name, using the Ethereum Name Service.
We’ll explore the first option in the next section, and we’ll dig into the second in The Ethereum Name Service (ENS).
Storing the Auction DApp on Swarm
We introduced Swarm in Swarm, earlier in this chapter. Our Auction DApp already uses Swarm to store the icon image for each auction. This is a much more efficient solution than attempting to store data on Ethereum, which is expensive. It is also a lot more resilient than if these images were stored in a centralized service like a web server or file server.
But we can take things one step further. We can store the entire frontend of the DApp itself in Swarm and run it from a Swarm node directly, instead of running a web server.
Preparing Swarm
To get started, you need to install Swarm and initialize your Swarm node. Swarm is part of the Ethereum Foundation’s Go-Ethereum suite of tools. Refer to the instructions for installing Go-Ethereum in [go_ethereum_geth], or to install a Swarm binary release, follow the instructions in the Swarm documentation.
Once you have installed Swarm, you can check that it is working correctly by running it with the version command:
$ swarm version
Version: 0.3
Git Commit: 37685930d953bcbe023f9bc65b135a8d8b8f1488
Go Version: go1.10.1
OS: linux
To start running Swarm, you must tell it how to connect to an instance of Geth, to access the JSON-RPC API. Get it started by following the instructions in the Getting Started guide.
When you start Swarm, you should see something like this:
Maximum peer count                       ETH=25 LES=0 total=25
Starting peer-to-peer node               instance=swarm/v0.3.1-225171a4/linux...
connecting to ENS API                    url=http://127.0.0.1:8545
swarm[5955]: [189B blob data]
Starting P2P networking
UDP listener up                          self=enode://f50c8e19ff841bcd5ce7d2d...
Updated bzz local addr                   oaddr=9c40be8b83e648d50f40ad3... uaddr=e
Starting Swarm service
9c40be8b hive starting
detected an existing store. trying to load peers
hive 9c40be8b: peers loaded
Swarm network started on bzz address: 9c40be8b83e648d50f40ad3d35f...
Pss started
Streamer started
IPC endpoint opened                      url=/home/ubuntu/.ethereum/bzzd.ipc
RLPx listener up                         self=enode://f50c8e19ff841bcd5ce7d2d...
You can confirm that your Swarm node is running correctly by connecting to the local Swarm gateway web interface: http://localhost:8500.
You should see a screen like the one in Swarm gateway on localhost and be able to query any Swarm hash or ENS name.
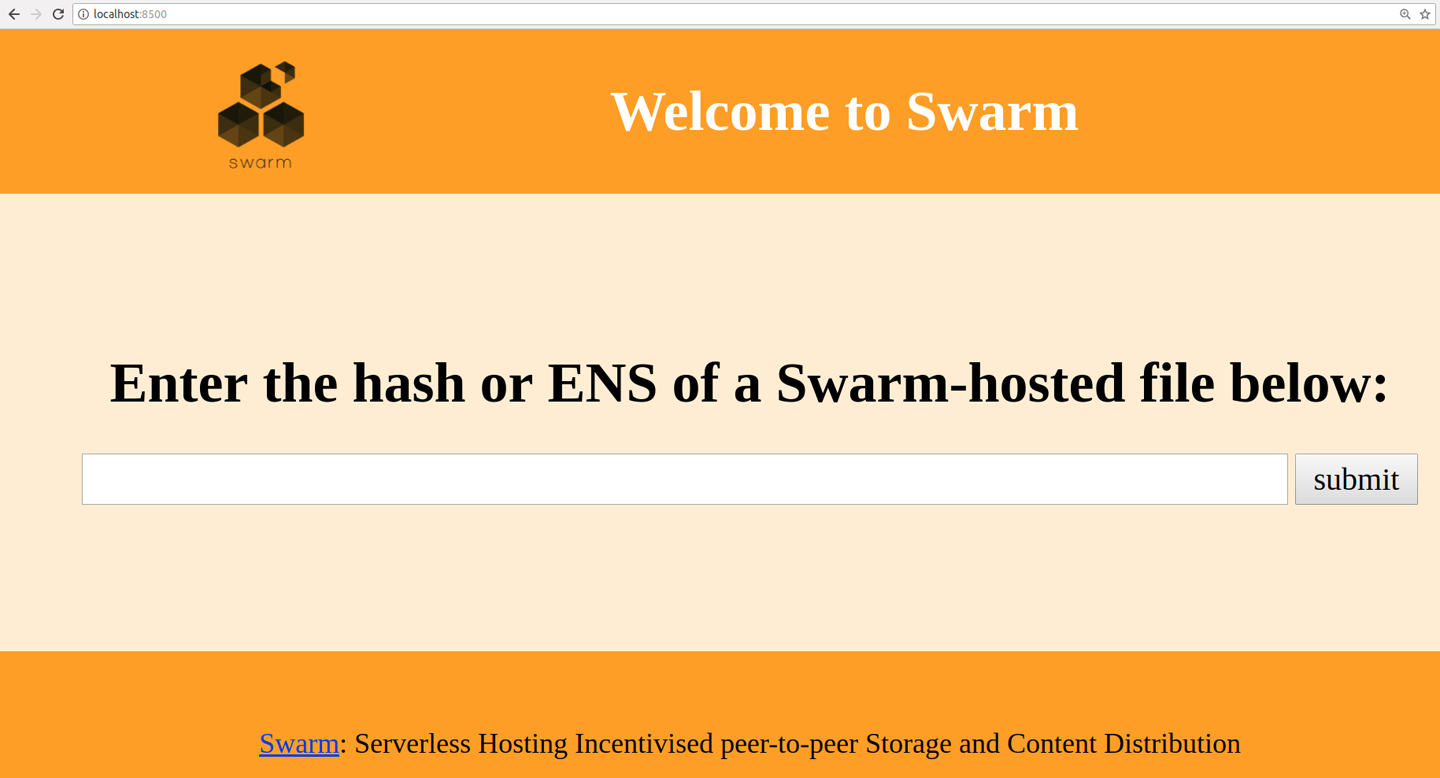
Figure 4. Swarm gateway on localhost
Uploading Files to Swarm
Once you have your local Swarm node and gateway running, you can upload to Swarm and the files will be accessible on any Swarm node, simply by reference to the file hash.
Let’s test this by uploading a file:
$ swarm up code/auction_dapp/README.md
ec13042c83ffc2fb5cb0aa8c53f770d36c9b3b35d0468a0c0a77c97016bb8d7c
Swarm has uploaded the README.md file and returned a hash that you can use to access the file from any Swarm node. For example, you could use the public Swarm gateway.
While uploading one file is relatively straightforward, it is a bit more complex to upload an entire DApp frontend. That’s because the various DApp resources (HTML, CSS, JavaScript, libraries, etc.) have embedded references to each other. Normally, a web server translates URLs to local files and serves the correct resources. We can achieve the same for Swarm by packaging our DApp.
In the Auction DApp, there’s a script for packaging all the resources:
$ cd code/auction_dapp/frontend
$ npm run build

> frontend@1.0.0 build /home/aantonop/Dev/ethereumbook/code/auction_dapp/frontend
> node build/build.js

Hash: 9ee134d8db3c44dd574d
Version: webpack 3.10.0
Time: 25665ms
Asset     Size
static/js/vendor.77913f316aaf102cec11.js  1.25 MB
static/js/app.5396ead17892922422d4.js   502 kB
static/js/manifest.87447dd4f5e60a5f9652.js  1.54 kB
static/css/app.0e50d6a1d2b1ed4daa03d306ced779cc.css  1.13 kB
static/css/app.0e50d6a1d2b1ed4daa03d306ced779cc.css.map  2.54 kB
static/js/vendor.77913f316aaf102cec11.js.map  4.74 MB
static/js/app.5396ead17892922422d4.js.map   893 kB
static/js/manifest.87447dd4f5e60a5f9652.js.map  7.86 kB
index.html  1.15 kB

Build complete.
The result of this command will be a new directory, code/auction_dapp/frontend/dist, that contains the entire Auction DApp frontend, packed together:
dist/
|-- index.html
`-- static
    |-- css
    |   |-- app.0e50d6a1d2b1ed4daa03d306ced779cc.css
    |   `-- app.0e50d6a1d2b1ed4daa03d306ced779cc.css.map
    `-- js
        |-- app.5396ead17892922422d4.js
        |-- app.5396ead17892922422d4.js.map
        |-- manifest.87447dd4f5e60a5f9652.js
        |-- manifest.87447dd4f5e60a5f9652.js.map
        |-- vendor.77913f316aaf102cec11.js
        `-- vendor.77913f316aaf102cec11.js.map
Now you can upload the entire DApp to Swarm, by using the up command and the --recursive option. Here, we also tell Swarm that index.html is the defaultpath for loading this DApp:
$ swarm --bzzapi http://localhost:8500 --recursive \
  --defaultpath dist/index.html up dist/

ab164cf37dc10647e43a233486cdeffa8334b026e32a480dd9cbd020c12d4581
Now, our entire Auction DApp is hosted on Swarm and accessible by the Swarm URL:
- bzz://ab164cf37dc10647e43a233486cdeffa8334b026e32a480dd9cbd020c12d4581
We’ve made some progress in decentralizing our DApp, but we’ve made it harder to use. A URL like that is much less user-friendly than a nice name like auction_dapp.com. Are we forced to sacrifice usability in order to gain decentralization? Not necessarily. In the next section we will examine Ethereum’s name service, which allows us to use easy-to-read names but still preserves the decentralized nature of our application.
The Ethereum Name Service (ENS)
You can design the best smart contract in the world, but if you don’t provide a good interface for users, they won’t be able to access it.
On the traditional internet, the Domain Name System (DNS) allows us to use human-readable names in the browser while resolving those names to IP addresses or other identifiers behind the scenes. On the Ethereum blockchain, the Ethereum Naming System (ENS) solves the same problem, but in a decentralized manner.
For example, the Ethereum Foundation donation address is 0xfB6916095ca1df60 bB79Ce92cE3Ea74c37c5d359; in a wallet that supports ENS, it’s simply ethereum.eth.
ENS is more than a smart contract; it’s a fundamental DApp itself, offering a decentralized name service. Furthermore, ENS is supported by a number of DApps for registration, management, and auctions of registered names. ENS demonstrates how DApps can work together: it’s DApp built to serve other DApps, supported by an ecosystem of DApps, embedded in other DApps, and so on.
In this section we will look at how ENS works. We’ll demonstrate how you can set up your own name and link it to a wallet or Ethereum address, how you can embed ENS in another DApp, and how you can use ENS to name your DApp resources to make them easier to use.
History of Ethereum Name Services
Name registration was the first noncurrency application of blockchains, pioneered by Namecoin. The Ethereum White Paper gave a two-line Namecoin-like registration system as one of its example applications.
Early releases of Geth and the C++ Ethereum client had a built-in namereg contract (not used any more), and many proposals and ERCs for name services were made, but it was only when Nick Johnson started working for the Ethereum Foundation in 2016 and took the project under his wing that serious work on a registrar started.
ENS was launched on Star Wars Day, May 4, 2017 (after a failed attempt to launch it on Pi Day, March 15).
The ENS Specification
ENS is specified mainly in three Ethereum Improvement Proposals: EIP-137, which specifies the basic functions of ENS; EIP-162, which describes the auction system for the .eth root; and EIP-181, which specifies reverse registration of addresses.
ENS follows a "sandwich" design philosophy: a very simple layer on the bottom, followed by layers of more complex but replaceable code, with a very simple top layer that keeps all the funds in separate accounts.
Bottom Layer: Name Owners and Resolvers
The ENS operates on "nodes" instead of human-readable names: a human-readable name is converted to a node using the "Namehash" algorithm.
The base layer of ENS is a cleverly simple contract (less than 50 lines of code) defined by ERC137 that allows only nodes' owners to set information about their names and to create subnodes (the ENS equivalent of DNS subdomains).
The only functions on the base layer are those that enable a node owner to set information about their own node (specifically the resolver, time to live, or transferring the ownership) and to create owners of new subnodes.
The Namehash algorithm
Namehash is a recursive algorithm that can convert any name into a hash that identifies the name.
"Recursive" means that we solve the problem by solving a subproblem that is a smaller problem of the same type, and then use the solution to the subproblem to solve the original problem.
Namehash recursively hashes components of the name, producing a unique, fixed-length string (or “node”) for any valid input domain. For example, the Namehash node of subdomain.example.eth is keccak('<example.eth>' node) + keccak('<subdomain>'). The subproblem we must solve is to compute the node for example.eth, which is keccak('<.eth>' node) + keccak('<example>'). To begin, we must compute the node for eth, which is keccak(<root node>) + keccak('<eth>').
The root node is what we call the "base case" of our recursion, and we obviously can’t define it recursively, or the algorithm will never terminate! The root node is defined as 0x0000000000000000000000000000000000000000000000000000000000000000 (32 zero bytes).
Putting this all together, the node of subdomain.example.eth is therefore keccak(keccak(keccak(0x0...0 + keccak('eth')) + keccak('example')) + keccak('subdomain')).
Generalizing, we can define the Namehash function as follows (the base case for the root node, or empty name, followed by the recursive step):
namehash([]) = 0x0000000000000000000000000000000000000000000000000000000000000000
namehash([label, ...]) = keccak256(namehash(...) + keccak256(label))
In Python this becomes:
def namehash(name):
  if name == '':
    return '\0' * 32
  else:
    label, _, remainder = name.partition('.')
    return sha3(namehash(remainder) + sha3(label))
Thus, mastering-ethereum.eth will be processed as follows:
namehash('mastering-ethereum.eth')
⇒ sha3(namehash('eth') + sha3('mastering-ethereum'))
⇒ sha3(sha3(namehash('') + sha3('eth')) + sha3('mastering-ethereum'))
⇒ sha3(sha3(('\0' * 32) + sha3('eth')) + sha3('mastering-ethereum'))
Of course, subdomains can themselves have subdomains: there could be a sub.subdomain.example.eth after subdomain.example.eth, then a sub.sub.subdomain.example.eth, and so on. To avoid expensive recomputation, since Namehash depends only on the name itself, the node for a given name can be precomputed and inserted into a contract, removing the need for string manipulation and permitting immediate lookup of ENS records regardless of the number of components in the raw name.
How to choose a valid name
Names consist of a series of dot-separated labels. Although upper- and lowercase letters are allowed, all labels should follow a UTS #46 normalization process that case-folds labels before hashing them, so names with different case but identical spelling will end up with the same Namehash.
You could use labels and domains of any length, but for the sake of compatibility with legacy DNS, the following rules are recommended:
-
Labels should be no more than 64 characters each.
-
Complete ENS names should be no more than 255 characters.
-
Labels should not start or end with hyphens, or start with digits.
Root node ownership
One of the results of this hierarchical system is that it relies on the owners of the root node, who are able to create top-level domains (TLDs).
While the eventual goal is to adopt a decentralized decision-making process for new TLDs, at the time of writing the root node is controlled by a 4-of-7 multisig, held by people in different countries (built as a reflection of the 7 keyholders of the DNS system). As a result, a majority of at least 4 of the 7 keyholders is required to effect any change.
Currently the purpose and goal of these keyholders is to work in consensus with the community to:
-
Migrate and upgrade the temporary ownership of the .eth TLD to a more permanent contract once the system is evaluated.
-
Allow adding new TLDs, if the community agrees they are needed.
-
Migrate the ownership of the root multisig to a more decentralized contract, when such a system is agreed upon, tested, and implemented.
-
Serve as a last-resort way to deal with any bugs or vulnerabilities in the top-level registries.
Resolvers
The basic ENS contract can’t add metadata to names; that is the job of so-called "resolver contracts." These are user-created contracts that can answer questions about the name, such as what Swarm address is associated with the app, what address receives payments to the app (in ether or tokens), or what the hash of the app is (to verify its integrity).
Middle Layer: The .eth Nodes
At the time of writing, the only top-level domain that is uniquely registrable in a smart contract is .eth.
|
Note
|
There’s work underway on enabling traditional DNS domain owners to claim ENS ownership. While in theory this could work for .com, the only domain that this has been implemented for so far is .xyz, and only on the Ropsten testnet. |
.eth domains are distributed via an auction system. There is no reserved list or priority, and the only way to acquire a name is to use the system. The auction system is a complex piece of code (over 500 lines); most of the early development efforts (and bugs!) in ENS were in this part of the system. However, it’s also replaceable and upgradeable, without risk to the funds—more on that later.
Vickrey auctions
Names are distributed via a modified Vickrey auction. In a traditional Vickrey auction, every bidder submits a sealed bid, and all of them are revealed simultaneously, at which point the highest bidder wins the auction but only pays the second-highest bid. Therefore bidders are incentivized not to bid less than the true value of the name to them, since bidding their true value increases the chance they will win but does not affect the price they will eventually pay.
On a blockchain, some changes are required:
-
To ensure bidders don’t submit bids they have no intention of paying, they must lock up a value equal to or higher than their bid beforehand, to guarantee the bid is valid.
-
Because you can’t hide secrets on a blockchain, bidders must execute at least two transactions (a commit–reveal process), in order to hide the original value and name they bid on.
-
Since you can’t reveal all bids simultaneously in a decentralized system, bidders must reveal their own bids themselves; if they don’t, they forfeit their locked-up funds. Without this forfeit, one could make many bids and choose to reveal only one or two, turning a sealed-bid auction into a traditional increasing price auction.
Therefore, the auction is a four-step process:
-
Start the auction. This is required to broadcast the intent to register a name. This creates all auction deadlines. The names are hashed, so that only those who have the name in their dictionary will know which auction was opened. This allows some privacy, which is useful if you are creating a new project and don’t want to share details about it. You can open multiple dummy auctions at the same time, so if someone is following you they cannot simply bid on all auctions you open.
-
Make a sealed bid. You must do this before the bidding deadline, by tying a given amount of ether to the hash of a secret message (containing, among other things, the hash of the name, the actual amount of the bid, and a salt). You can lock up more ether than you are actually bidding in order to mask your true valuation.
-
Reveal the bid. During the reveal period, you must make a transaction that reveals the bid, which will then calculate the highest bid and the second-highest bid and send ether back to unsuccessful bidders. Every time the bid is revealed the current winner is recalculated; therefore, the last one to be set before the revealing deadline expires becomes the overall winner.
-
Clean up after. If you are the winner, you can finalize the auction in order to get back the difference between your bid and the second-highest bid. If you forgot to reveal you can make a late reveal and recover a little of your bid.
Top Layer: The Deeds
The top layer of ENS is yet another super-simple contract with a single purpose: to hold the funds.
When you win a name, the funds are not actually sent anywhere, but are just locked up for the period you want to hold the name (at least a year). This works like a guaranteed buyback: if the owner does not want the name any more they can sell it back to the system and recover their ether (so the cost of holding the name is the opportunity cost of doing something with a return greater than zero).
Of course, having a single contract hold millions of dollars in ether has proven to be very risky, so instead ENS creates a deed contract for each new name. The deed contract is very simple (about 50 lines of code), and it only allows the funds to be transferred back to a single account (the deed owner) and to be called by a single entity (the registrar contract). This approach drastically reduces the attack surface where bugs can put the funds at risk.
Registering a Name
Registering a name in ENS is a four-step process, as we saw in Vickrey auctions. First we place a bid for any available name, then we reveal our bid after 48 hours to secure the name. ENS timeline for registration is a diagram showing the timeline of registration.
Let’s register our first name!
We will use one of several available user-friendly interfaces to search for available names, place a bid on the name ethereumbook.eth, reveal the bid, and secure the name.
There are a number of web-based interfaces to ENS that allow us to interact with the ENS DApp. For this example, we will use the MyCrypto interface, in conjunction with MetaMask as our wallet.
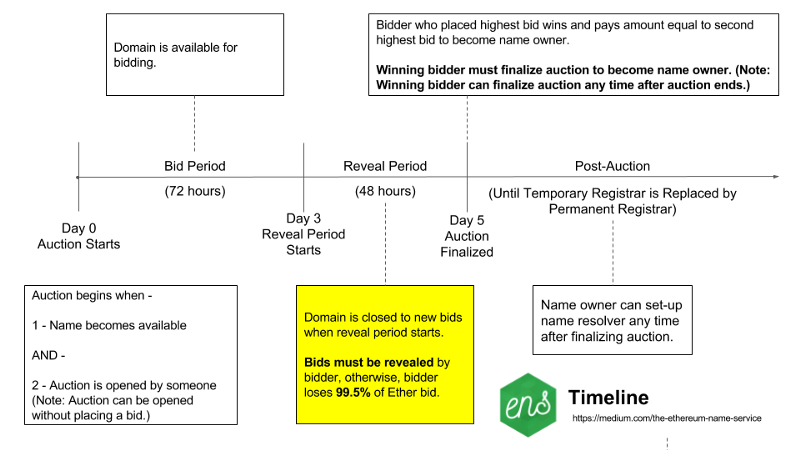
Figure 5. ENS timeline for registration
First, we need to make sure the name we want is available. While writing this book, we really wanted to register the name mastering.eth, but alas, Searching for ENS names on MyCrypto.com revealed it was already taken! Because ENS registrations only last one year, it might become possible to secure that name in the future. In the meantime, let’s search for ethereumbook.eth (Searching for ENS names on MyCrypto.com).
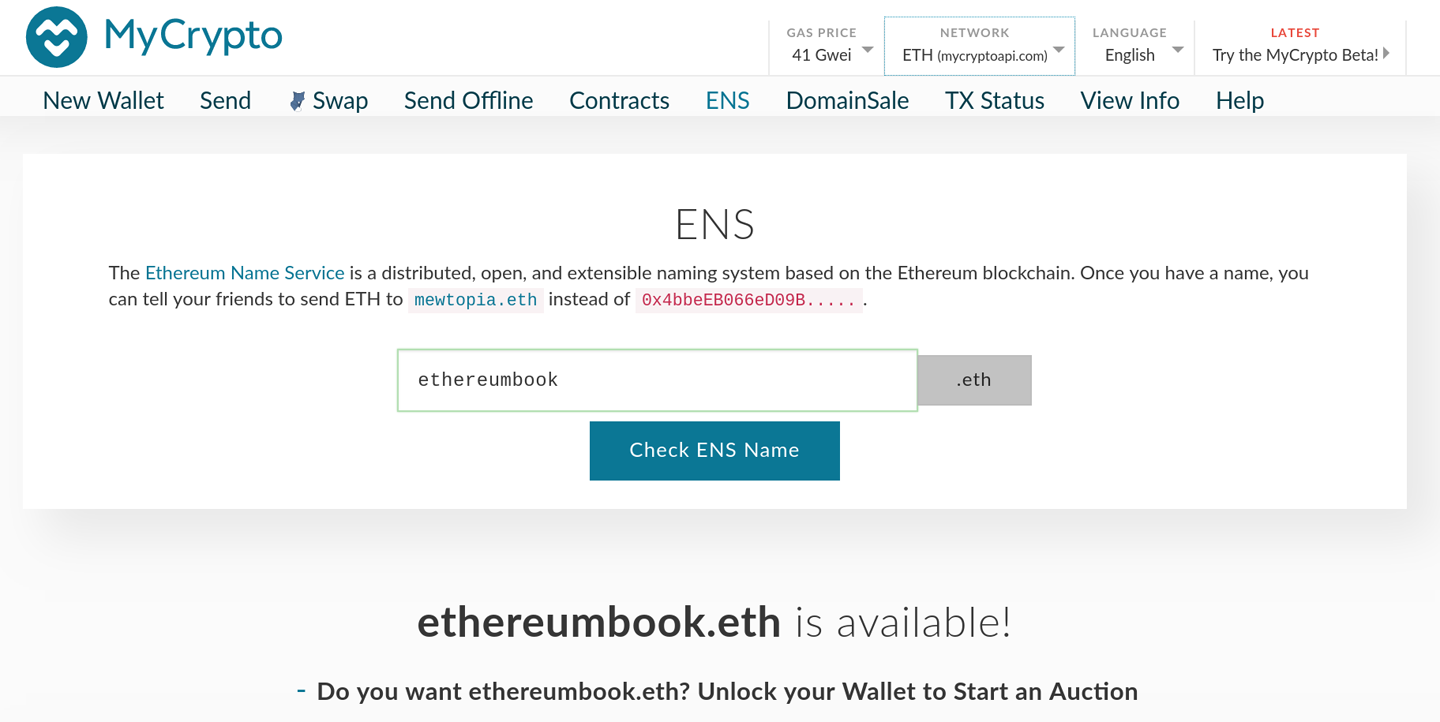
Figure 6. Searching for ENS names on MyCrypto.com
Great! The name is available. In order to register it, we need to move forward with Starting an auction for an ENS name. Let’s unlock MetaMask and start an auction for ethereumbook.eth.
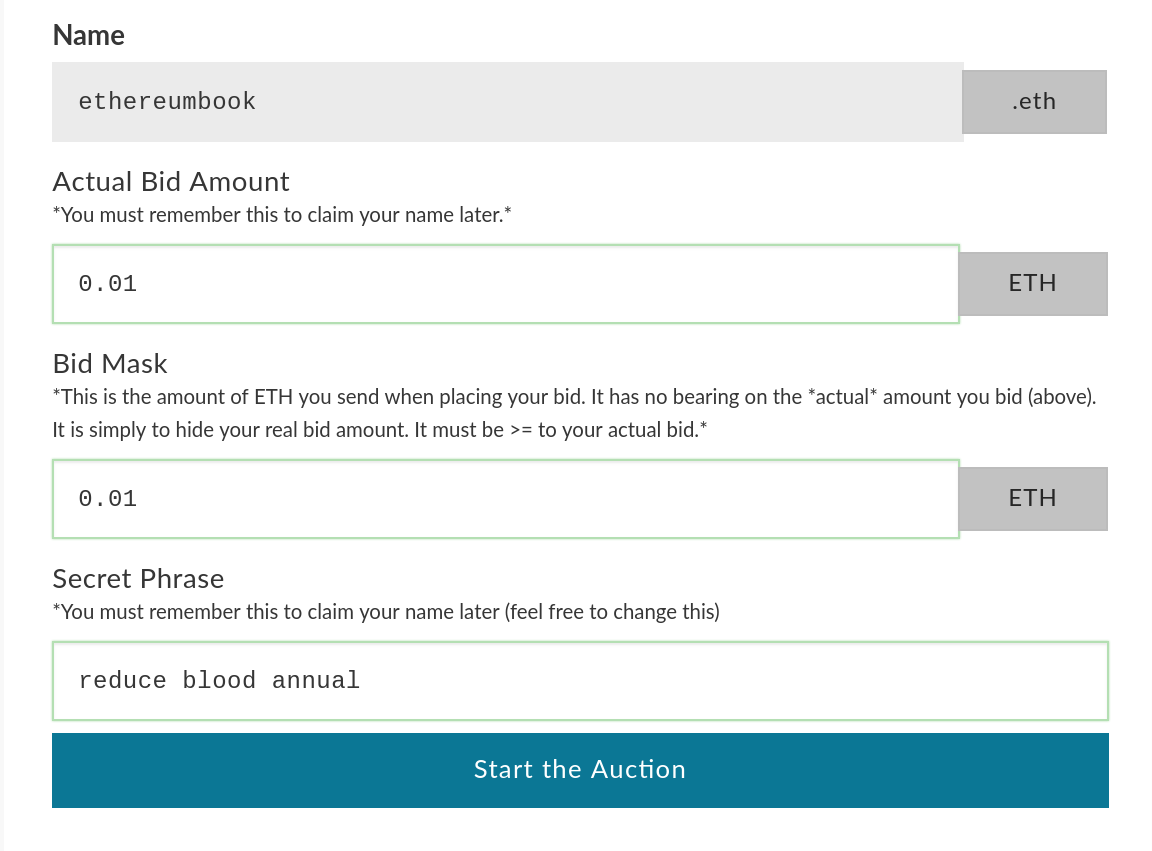
Figure 7. Starting an auction for an ENS name
Let’s make our bid. In order to do that we need to follow the steps in Placing a bid for an ENS name.
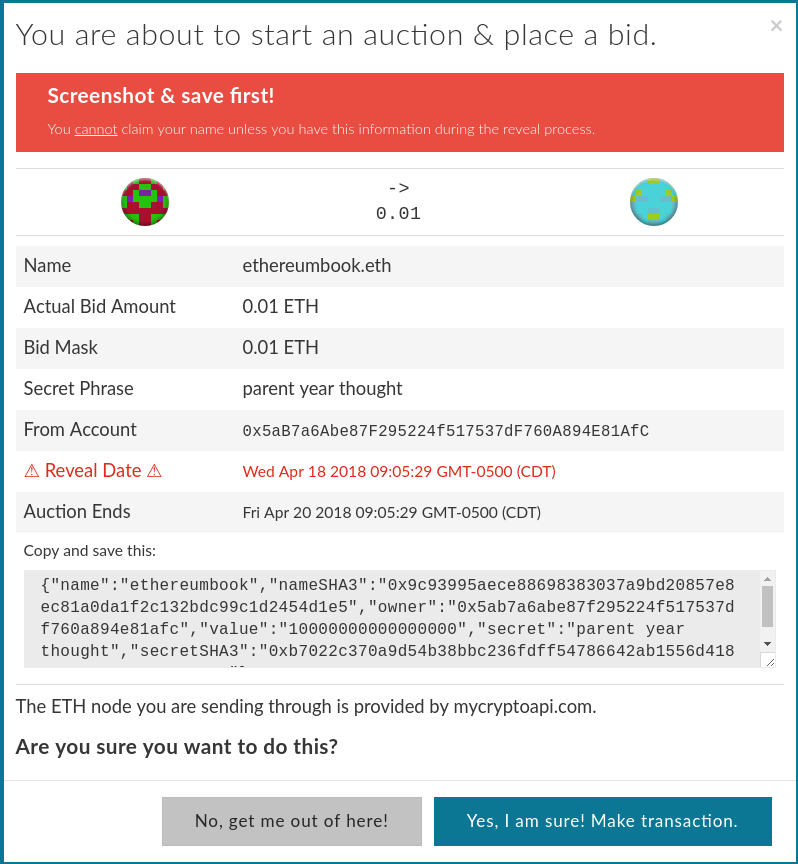
Figure 8. Placing a bid for an ENS name
|
Warning
|
As mentioned in Vickrey auctions, you must reveal your bid within 48 hours after the auction is complete, or you lose the funds in your bid. Did we forget to do this and lose 0.01 ETH ourselves? You bet we did. Take a screenshot, save your secret phrase (as a backup for your bid), and add a reminder in your calendar for the reveal date and time, so you don’t forget and lose your funds. |
Finally, we confirm the transaction by clicking the big green submit button shown in MetaMask transaction containing your bid.
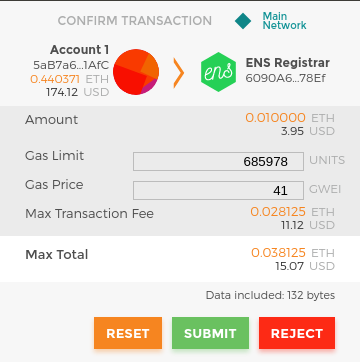
Figure 9. MetaMask transaction containing your bid
If all goes well, after submitting a transaction in this way you can return and reveal the bid in 48 hours, and the name you requested will be registered to your Ethereum address.
Managing Your ENS Name
Once you have registered an ENS name, you can manage it using another user-friendly interface: ENS Manager.
Once there, enter the name you want to manage in the search box (see The ENS Manager web interface). You need to have your Ethereum wallet (e.g., MetaMask) unlocked, so that the ENS Manager DApp can manage the name on your behalf.

Figure 10. The ENS Manager web interface
From this interface, we can create subdomains, set a resolver contract (more on that later), and connect each name to the appropriate resource, such as the Swarm address of a DApp frontend.
Creating an ENS subdomain
First, let’s create a subdomain for our example Auction DApp (see Adding the subdomain auction.ethereumbook.eth). We will name the subdomain auction, so the fully qualified name will be auction.ethereumbook.eth.
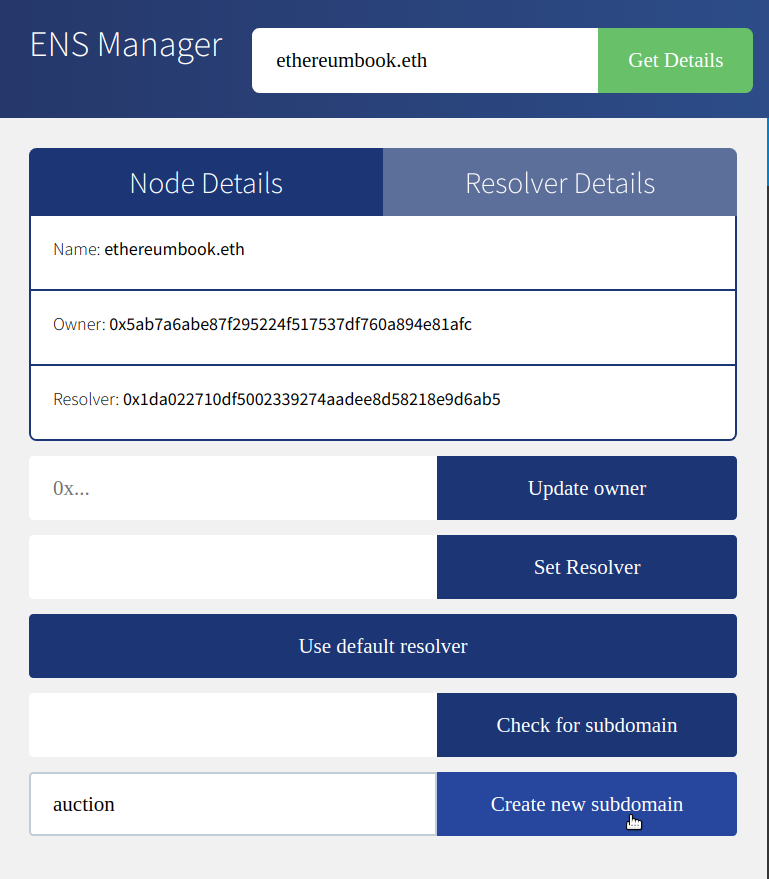
Figure 11. Adding the subdomain auction.ethereumbook.eth
Once we’ve created the subdomain, we can enter auction.ethereumbook.eth in the search box and manage it, just as we managed the domain ethereumbook.eth previously.
ENS Resolvers
In ENS, resolving a name is a two-step process:
-
The ENS registry is called with the name to resolve after hashing it. If the record exists, the registry returns the address of its resolver.
-
The resolver is called, using the method appropriate to the resource being requested. The resolver returns the desired result.
This two-step process has several benefits. Separating the functionality of resolvers from the naming system itself gives us a lot more flexibility. The owners of names can use custom resolvers to resolve any type or resource, extending the functionality of ENS. For example, if in the future you wanted to link a geolocation resource (longitude/lattitude) to an ENS name, you could create a new resolver that answers a geolocation query. Who knows what applications might be useful in the future? With custom resolvers, the only limitation is your imagination.
For convenience, there is a default public resolver that can resolve a variety of resources, including the address (for wallets or contracts) and content (a Swarm hash for DApps or contract source code).
Since we want to link our Auction DApp to a Swarm hash, we can use the public resolver, which supports content resolution, as shown in Setting the default public resolver for auction.ethereumbook.eth; we don’t need to code or deploy a custom resolver.

Figure 12. Setting the default public resolver for auction.ethereumbook.eth
Resolving a Name to a Swarm Hash (Content)
Once the resolver for auction.ethereumbook.eth is set to be the public resolver, we can set it to return the Swarm hash as the content of our name (see Setting the 'content' to return for auction.ethereumbook.eth).
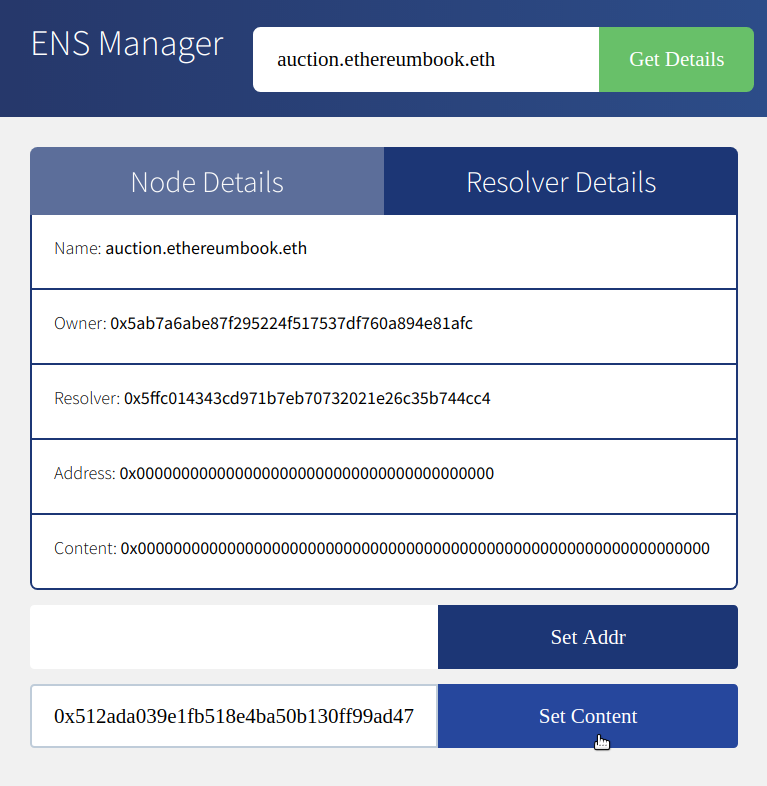
Figure 13. Setting the 'content' to return for auction.ethereumbook.eth
After waiting a short time for our transaction to be confirmed, we should be able to resolve the name correctly. Before setting a name, our Auction DApp could be found on a Swarm gateway by its hash:
- https://swarm-gateways.net/bzz:/ab164cf37dc10647e43a233486cdeffa8334b026e32a480dd9cbd020c12d4581
or by searching in a DApp browser or Swarm gateway for the Swarm URL:
- bzz://ab164cf37dc10647e43a233486cdeffa8334b026e32a480dd9cbd020c12d4581
Now that we have attached it to a name, it is much easier:
- http://swarm-gateways.net/bzz:/auction.ethereumbook.eth/
We can also find it by searching for "auction.ethereumbook.eth" in any ENS-compatible wallet or DApp browser (e.g., Mist).
From App to DApp
Over the past several sections, we have gradually built a decentralized application. We started with a pair of smart contracts to run an auction for ERC721 deeds. These contracts were designed to have no governing or privileged accounts, so that their operation is truly decentralized. We added a frontend, implemented in JavaScript, that offers a convenient and user-friendly interface to our DApp. The auction DApp uses the decentralized storage system Swarm to store application resources such as images. The DApp also uses the decentralized communications protocol Whisper to offer an encrypted chat room for each auction, without any central servers.
We uploaded the entire frontend to Swarm, so that our DApp doesn’t rely on any web servers to serve the files. Finally, we allocated a name for our DApp using ENS, connecting it to the Swarm hash of the frontend, so that users can access it with a simple and easy-to-remember human-readable name.
With each of these steps, we increased the decentralization of our application. The final result is a DApp that has no central point of authority, no central point of failure, and expresses the "web3" vision.
Auction DApp architecture shows the complete architecture of the Auction DApp.
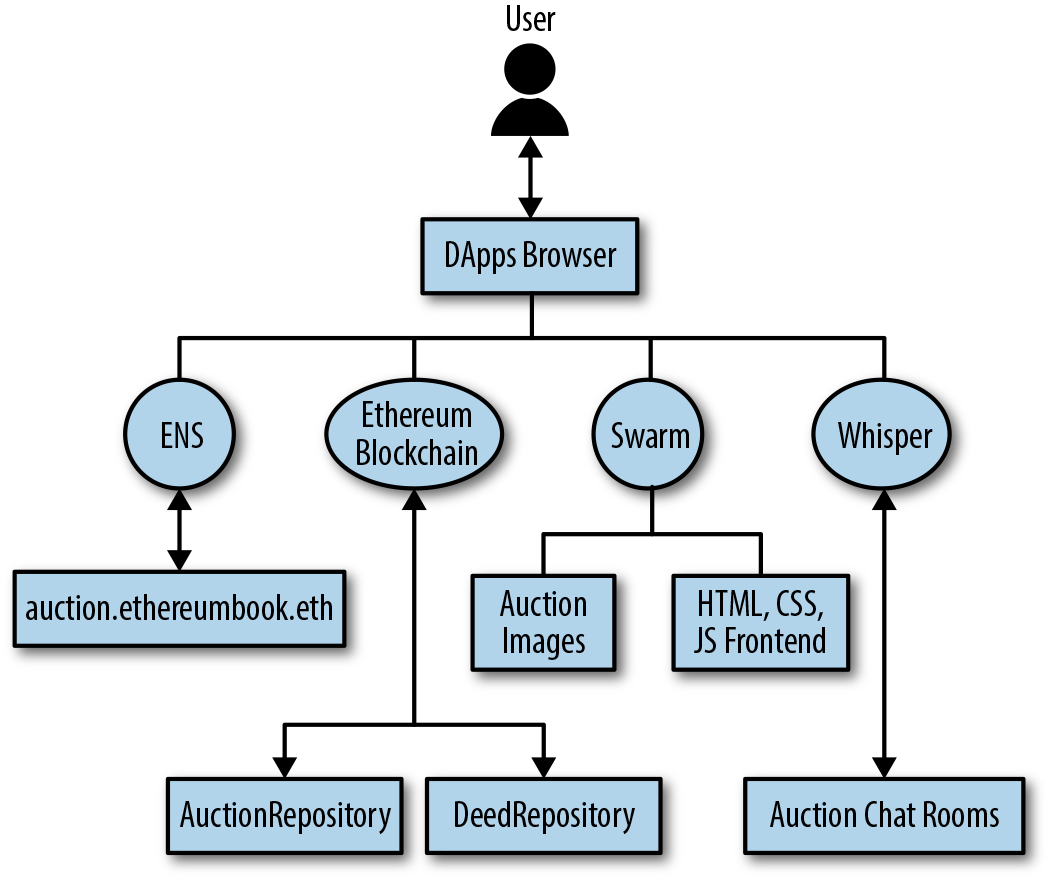
Figure 14. Auction DApp architecture
Conclusions
Decentralized applications are the culmination of the Ethereum vision, as expressed by the founders from the very earliest designs. While a lot of applications call themselves "DApps" today, most are not fully decentralized. However, it is already possible to construct applications that are almost completely decentralized. Over time, as the technology matures further, more and more of our applications can be decentralized, resulting in a more resilient, censorship-resistant, and free web.