Faucet +---- contracts | `---- Migrations.sol +---- migrations | `---- 1_initial_migration.js +---- test +---- truffle-config.js `---- truffle.js
Appendix A: Development Tools, Frameworks, and Libraries
Frameworks
Frameworks can be used to ease Ethereum smart contract development. By doing everything yourself you get a better understanding of how everything fits together, but it’s a lot of tedious, repetitive work. The frameworks described in this section can automate certain tasks and make development easier.
Truffle
Website: https://truffleframework.com
Documentation: https://truffleframework.com/docs
Truffle Boxes: http://truffleframework.com/boxes/
npm package repository: https://www.npmjs.com/package/truffle
Installing the Truffle framework
The Truffle framework comprises several Node.js packages. Before you install truffle, you need to have an up-to-date and working installation of Node.js and the Node Package Manager (npm).
The recommended way to install Node.js and npm is to use the Node Version Manager (nvm). Once you install nvm, it will handle all the dependencies and updates for you. Follow the instructions found at http://nvm.sh.
Once nvm is installed on your operating system, installing Node.js is simple. Use the --lts flag to tell nvm that you want the most recent “long-term support” (LTS) version of Node.js:
$ nvm install --lts
Confirm you have node and npm installed:
$ node -v
v8.9.4
$ npm -v
5.6.0
Next, create a hidden file, .nvmrc, that contains the Node.js version supported by your DApp so developers just need to run nvm install in the root of the project directory and it will automatically install and switch to using that version:
$ node -v > .nvmrc
$ nvm install
Looking good. Now to install truffle:
$ npm -g install truffle

+ truffle@4.0.6
installed 1 package in 37.508s
Integrating a prebuilt Truffle project (Truffle Box)
If you want to use or create a DApp that builds upon prebuilt boilerplate, go to the Truffle Boxes website, choose an existing Truffle project, and then run the following command to download and extract it:
$ truffle unbox BOX_NAME
Creating a truffle project directory
For each project where you will use truffle, create a project directory and initialize truffle within that directory. truffle will create the necessary directory structure inside your project directory. It’s customary to give the project directory a name that describes the project. For this example, we will use truffle to deploy our Faucet contract from [simple_contract_example], and therefore we will name the project folder Faucet:
$ mkdir Faucet
$ cd Faucet
Faucet $
Once inside the Faucet directory, we initialize truffle:
Faucet $ truffle init
truffle creates a directory structure and some default files:
We will also use a number of JavaScript (Node.js) support packages, in addition to truffle itself. We can install these with npm. We initialize the npm directory structure and accept the defaults suggested by npm:
$ npm init

package name: (faucet)
version: (1.0.0)
description:
entry point: (truffle-config.js)
test command:
git repository:
keywords:
author:
license: (ISC)
About to write to Faucet/package.json:

{
  "name": "faucet",
  "version": "1.0.0",
  "description": "",
  "main": "truffle-config.js",
  "directories": {
    "test": "test"
  },
  "scripts": {
    "test": "echo \"Error: no test specified\" && exit 1"
  },
  "author": "",
  "license": "ISC"
}


Is this ok? (yes)
Now, we can install the dependencies that we will use to make working with truffle easier:
$ npm install dotenv truffle-wallet-provider ethereumjs-wallet
We now have a node_modules directory with several thousand files inside our Faucet directory.
Prior to deploying a DApp to a cloud production or continuous integration environment, it is important to specify the engines field so that your DApp is built with the correct Node.js version and its associated dependencies are installed. For details on configuring this field, see the documentation.
Configuring truffle
truffle creates some empty configuration files, truffle.js and truffle-config.js. On Windows systems the truffle.js name may cause a conflict when you try to run the command truffle and Windows attempts to run truffle.js instead. To avoid this, we will delete truffle.js and use truffle-config.js (in support of Windows users, who, honestly, suffer enough already):
$ rm truffle.js
Now we edit truffle-config.js and replace the contents with the sample configuation shown here:
module.exports = {
  networks: {
    localnode: { // Whatever network our local node connects to
      network_id: "*", // Match any network ID
      host: "localhost",
      port: 8545,
    }
  }
};
This configuration is a good starting point. It sets up one default Ethereum network (named localnode), which assumes we are running an Ethereum client such as Parity, either as a full node or as a light client. This configuration will instruct truffle to communicate with the local node over RPC, on port 8545. truffle will use whatever Ethereum network the local node is connected to, such as the Ethereum main network, or a test network like Ropsten. The local node will also be providing the wallet functionality.
In following sections, we will configure additional networks for truffle to use, such as the ganache local test blockchain and Infura, a hosted network provider. As we add more networks, the configuration file will get more complex, but it will also give us more options for our testing and development workflow.
Using truffle to deploy a contract
We now have a basic working directory for our Faucet project, and we have truffle and its dependencies configured. Contracts go in the contracts subdirectory of our project. The directory already contains a "helper" contract, Migrations.sol, which manages contract upgrades for us. We’ll examine the use of Migrations.sol in the next section.
Let’s copy the Faucet.sol contract (from [solidity_faucet_example]) into the contracts subdirectory, so that the project directory looks like this:
Faucet
+---- contracts
|   +---- Faucet.sol
|   `---- Migrations.sol
...
We can now ask truffle to compile the contract for us:
$ truffle compile
Compiling ./contracts/Faucet.sol...
Compiling ./contracts/Migrations.sol...
Writing artifacts to ./build/contracts
Truffle migrations—understanding deployment scripts
Truffle offers a deployment system called a migration. If you have worked in other frameworks, you may have seen something similar: Ruby on Rails, Python Django, and many other languages and frameworks have a migrate command.
In all those frameworks, the purpose of a migration is to handle changes in the data schema between different versions of the software. The purpose of migrations in Ethereum is slightly different. Because Ethereum contracts are immutable and cost gas to deploy, Truffle offers a migration mechanism to keep track of which contracts (and which versions) have already been deployed. In a complex project with dozens of contracts and complex dependencies, you would not want to have to pay to redeploy contracts that haven’t changed. You would also not want to manually track which versions of which contracts have been deployed already. The Truffle migration mechanism does all that by deploying the smart contract Migrations.sol, which then keeps track of all other contract deployments.
We have only one contract, Faucet.sol, which means that the migration system is overkill, to say the least. Unfortunately, we have to use it. But, by learning how to use it for one contract, we can start practicing some good habits for our development workflow. The effort will pay off as things get more complicated.
Truffle’s migrations directory is where the migration scripts are found. Right now there’s only one script, 1_initial_migration.js, which deploys the Migrations.sol contract itself:
link:code/truffle/Faucet/migrations/1_initial_migration.js[]We need a second migration script, to deploy Faucet.sol. Let’s call it 2_deploy_contracts.js. It is very simple, just like 1_initial_migration.js, with only a few small changes. In fact, you can copy the contents of 1_initial_migration.j and simply replace all instances of Migrations with Faucet:
link:code/truffle/Faucet/migrations/2_deploy_contracts.js[]The script initializes a variable Faucet, identifying the Faucet.sol Solidity source code as the artifact that defines Faucet. Then it calls the deploy function to deploy this contract.
We’re all set. Let’s use truffle migrate to deploy it on. We have to specify which network to deploy the contract, using the --network argument. We only have one network specified in the configuration file, which we named localnode. Make sure your local Ethereum client is running and then type:
Faucet $ truffle migrate --network localnode
Because we are using a local node to connect to the Ethereum network and manage our wallet, we have to authorize the transaction that truffle creates. We’re running parity connected to the Ropsten test blockchain, so during the migration we’ll see a pop-up like the one in Parity asking for confirmation to deploy Faucet on Parity’s web console.
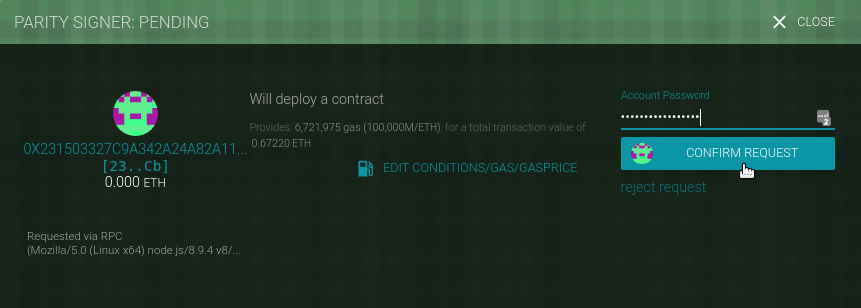
Figure 1. Parity asking for confirmation to deploy Faucet
There are four transactions in total: one to deploy Migrations, one to update the deployments counter to 1, one to deploy Faucet, and one to update the deployments counter to 2.
Truffle will show the migrations completing, show each of the transactions, and show the contract addresses:
$ truffle migrate --network localnode
Using network 'localnode'.

Running migration: 1_initial_migration.js
  Deploying Migrations...
  ... 0xfa090db179d023d2abae543b4a21a1479e70ca7d35a469a5d1a98bfc6bd80fe8
  Migrations: 0x8861c27715550bed8362c0345add158489df6db0
Saving successful migration to network...
  ... 0x985c4a32716826ddbe4eae284104bef8bc69e959899f62246a1b27c9dfcd6c03
Saving artifacts...
Running migration: 2_deploy_contracts.js
  Deploying Faucet...
  ... 0xecdbeef77f0558edc689440e34b7bba0a3ba7a45e4b680b071b47c30a930e9d6
  Faucet: 0xd01cd8e7bd29e4bff8c1693f59eee46137a9f300
Saving successful migration to network...
  ... 0x11f376bd7307edddfd40dc4a14c3f7cb84b6c921ac2465602060b67d08f9fd8a
Saving artifacts...
Using the Truffle console
Truffle offers a JavaScript console that we can use to interact with the Ethereum network (via the local node), interact with deployed contracts, and interact with the wallet provider. In our current configuration (localnode), the node and wallet provider is our local Parity client.
Let’s start the Truffle console and try some commands:
$ truffle console --network localnode
truffle(localnode)>
Truffle presents a prompt, showing the selected network configuration (localnode).
|
Tip
|
It’s important to remember and be aware of which network you are using. You wouldn’t want to accidentally deploy a test contract or make a transaction on the Ethereum main network. That could be an expensive mistake! |
The Truffle console offers an autocomplete function that makes it easy for us to explore the environment. If we press Tab after a partially completed command, Truffle will complete the command for us. Pressing Tab twice will show all possible completions if more than one command matches our input. In fact, if we press Tab twice on an empty prompt, Truffle lists all the available commands:
truffle(localnode)>
Array Boolean Date Error EvalError Function Infinity JSON Math NaN Number Object RangeError ReferenceError RegExp String SyntaxError TypeError URIError decodeURI decodeURIComponent encodeURI encodeURIComponent eval isFinite isNaN parseFloat parseInt undefined

ArrayBuffer Buffer DataView Faucet Float32Array Float64Array GLOBAL Int16Array Int32Array Int8Array Intl Map Migrations Promise Proxy Reflect Set StateManager Symbol Uint16Array Uint32Array Uint8Array Uint8ClampedArray WeakMap WeakSet WebAssembly XMLHttpRequest _ assert async_hooks buffer child_process clearImmediate clearInterval clearTimeout cluster console crypto dgram dns domain escape events fs global http http2 https module net os path perf_hooks process punycode querystring readline repl require root setImmediate setInterval setTimeout stream string_decoder tls tty unescape url util v8 vm web3 zlib

__defineGetter__ __defineSetter__ __lookupGetter__ __lookupSetter__ __proto__ constructor hasOwnProperty isPrototypeOf propertyIsEnumerable toLocaleString toString valueOf
The vast majority of the wallet- and node-related functions are provided by the web3 object, which is an instance of the web3.js library. The web3 object abstracts the RPC interface to our Parity node. You will also notice two objects with familiar names: Migrations and Faucet. Those represent the contracts we just deployed. We will use the Truffle console to interact with a contract. First, let’s check our wallet via the web3 object:
truffle(localnode)> web3.eth.accounts
[ '0x9e713963a92c02317a681b9bb3065a8249de124f',
  '0xdb5dc1a13e3a55cf3b4587cd8d1e5fdeb6738145' ]
Our Parity client has two wallets, with some test ether on Ropsten. The web3.eth.accounts attribute contains a list of all the accounts. We can check the balance of the first account using the getBalance function:
truffle(localnode)> web3.eth.getBalance(web3.eth.accounts[0]).toNumber()
191198572800000000
truffle(localnode)>
web3.js is a large JavaScript library that offers a comprehensive interface to the Ethereum system, via a provider such as a local client. We will examine web3.js in more detail in [web3js_tutorial]. Now let’s try to interact with our contracts:
truffle(localnode)> Faucet.address
'0xd01cd8e7bd29e4bff8c1693f59eee46137a9f300'
truffle(localnode)> web3.eth.getBalance(Faucet.address).toNumber()
0
truffle(localnode)>
Next, we’ll use sendTransaction to send some test ether to fund the Faucet contract. Note the use of web3.toWei to convert ether units for us. Typing 18 zeros without making a mistake is both difficult and dangerous, so it’s always better to use a unit converter for values. Here’s how we send the transaction:
truffle(localnode)> web3.eth.sendTransaction({from:web3.eth.accounts[0],
                    to:Faucet.address, value:web3.toWei(0.5, 'ether')});
'0xf134c75b985dc0e0c27c2f0412251e0860eb530a5055e660f21e7483ab336808'
If we switch to the Parity web interface, we’ll see a pop-up asking us to confirm this transaction. Once the transaction is mined, we’ll be able to see the balance of our Faucet contract:
truffle(localnode)> web3.eth.getBalance(Faucet.address).toNumber()
500000000000000000
Let’s call the withdraw function now, to withdraw some test ether from the contract:
truffle(localnode)> Faucet.deployed().then(instance =>
                       {instance.withdraw(web3.toWei(0.1,
                       'ether'))}).then(console.log)
Again, we’ll need to approve the transaction in the Parity web interface. If we check again we’ll see that the balance of the Faucet contract has decreased, and our test wallet has received 0.1 ether:
truffle(localnode)> web3.eth.getBalance(Faucet.address).toNumber()
400000000000000000
truffle(localnode)> Faucet.deployed().then(instance =>
                    {instance.withdraw(web3.toWei(1, 'ether'))})
StatusError: Transaction: 0xe147ae9e3610334...8612b92d3f9c
  exited with an error (status 0).
Embark
Documentation: https://embark.status.im/docs/
npm package repository: https://www.npmjs.com/package/embark
Embark is a framework built to allow developers to easily develop and deploy decentralized applications. Embark integrates with Ethereum, IPFS, Whisper, and Swarm to offer the following features:
-
Automatically deploy contracts and make them available in JS code.
-
Watch for changes and update contracts to redeploy if needed.
-
Manage and interact with different chains (e.g., testnet, local, mainnet).
-
Manage complex systems of interdependent contracts.
-
Store and retrieve data, including uploading and retrieving files hosted in IPFS.
-
Ease the process of deploying the full application to IPFS or Swarm.
-
Send and receive messages through Whisper.
You can install it with npm:
$ npm -g install embark
OpenZeppelin
Website: https://openzeppelin.org/
Documentation: https://openzeppelin.org/api/docs/open-zeppelin.html
OpenZeppelin is an open framework of reusable and secure smart contracts in the Solidity language.
It is community-driven, led by the Zeppelin team, with over a hundred external contributors. The main focus of the framework is security, achieved by applying industry-standard contract security patterns and best practices, drawing on all the experience the Zeppelin devs have gained from auditing a huge number of contracts, and through constant testing and auditing from the community that uses the framework as a base for their real-world applications.
The OpenZeppelin framework is the most widely used solution for Ethereum smart contracts. The framework currently has an ample library of contracts including implementations of ERC20 and ERC721 tokens, many flavors of crowdsale models, and simple behaviors commonly found in contracts such as Ownable, Pausable, or LimitBalance. The contracts in this repository in some cases function as de facto standard implementations.
The framework is licensed under an MIT license, and all the contracts have been designed with a modular approach to guarantee ease of reuse and extension. These are clean and basic building blocks, ready to be used in your next Ethereum project. Let’s set up the framework and build a simple crowdsale using the OpenZeppelin contracts, to demonstrate how easy it is to use. This example also stresses the importance of reusing secure components instead of writing them by yourself.
First, we will need to install the openzeppelin-solidity library into our workspace. The latest release as of the time of this writing is v1.9.0, so we will use that one:
$ mkdir sample-crowdsale
$ cd sample-crowdsale
$ npm install openzeppelin-solidity@1.9.0
$ mkdir contracts
At the time of writing, OpenZeppelin includes multiple basic token contracts that follow the ERC20, ERC721, and ERC827 standards, with different characteristics for emission, limits, vesting, life cycle, etc.
Let’s make an ERC20 token that’s mintable, meaning that the initial supply starts at 0 and new tokens can be created by the token owner (in our case, the crowdsale contract) and sold to buyers. In order to do this, we’ll create a contracts/SampleToken.sol file with the following contents:
link:code/OpenZeppelin/contracts/SampleToken.sol[]OpenZeppelin already provides a MintableToken contract that we can use as a base for our token, so we only define the details that are specific to our case. Next, let’s make the crowdsale contract. Just like with tokens, OpenZeppelin already provides a wide variety of crowdsale flavors. Currently, you will find contracts for various scenarios involving distribution, emission, price, and validation. So, let’s say that you want to set a goal for your crowdsale and if it’s not met by the time the sale finishes, you want to refund all your investors. For that, you can use the RefundableCrowdsale contract. Or maybe you want to define a crowdsale with an increasing price to incentivize early buyers; there is an IncreasingPriceCrowdsale contract just for that. You can also end the crowdsale when a specified amount of ether has been received by the contract (CappedCrowdsale), or set a finishing time with the TimedCrowdsale contract, or create a whitelist of buyers with the WhitelistedCrowdsale contract.
As we said before, the OpenZeppelin contracts are basic building blocks. These crowdsale contracts have been designed to be combined; just read the source code of the base Crowdsale contract for directions on how to extend it. For the crowdsale of our token, we need to mint tokens when ether is received by the crowdsale contract, so let’s use MintedCrowdsale as a base. And to make it more interesting, let’s also make it a PostDeliveryCrowdsale so the tokens can only be withdrawn after the crowdsale ends. To do this, we’ll write the following into contracts/SampleCrowdsale.sol:
link:code/OpenZeppelin/contracts/SampleCrowdsale.sol[]Again, we barely had to write any code; we just reused the battle-tested code that the OpenZeppelin community made available. However, it is important to note that this case is different than that of our SampleToken contract. If you go to the Crowdsale automated tests you will see that they are tested in isolation. When you integrate different units of code into a bigger component, it’s not enough to test all the units separately, because the interactions between them might cause behaviors that you didn’t expect. In particular, you will see that here we introduced multiple inheritance, which can surprise the developer if they don’t understand the details of Solidity. Our SampleCrowdsale contract is simple, and it will work just as we expect because the framework was designed to make cases like these straightforward; but do not relax your vigilance because of the simplicity that this framework introduces. Every time you integrate parts of the OpenZeppelin framework to build a more complex solution, you must fully test every aspect of your solution to ensure that all the interactions of the units work as you intend.
Finally, when we are happy with our solution and have tested it thoroughly, we need to deploy it. OpenZeppelin integrates well with Truffle, so we can just write a migrations file like the following (migrations/2_deploy_contracts.js), as explained in Truffle migrations—understanding deployment scripts:
link:code/OpenZeppelin/migrations/2_deploy_contracts.js[]|
Note
|
This was just a quick overview of a few of the contracts that are part of the OpenZeppelin framework. You are welcome to join the OpenZeppelin development community to learn and contribute. |
ZeppelinOS
GitHhub: https://github.com/zeppelinos
Website: https://zeppelinos.org
ZeppelinOS is “an open source, distributed platform of tools and services on top of the EVM to develop and manage smart contract applications securely.”
Unlike OpenZeppelin’s code, which needs to be redeployed with each application every time it’s used, ZeppelinOS’s code lives on-chain. Applications that need a given functionality—say, an ERC20 token—not only do not have to redesign and reaudit its implementation (something that OpenZeppelin solved) but do not even need to deploy it. With ZeppelinOS, an application interacts with the token’s on-chain implementation directly, in much the same way as a desktop application interacts with the components of its underlying OS.
At the core of ZeppelinOS sits a very clever contract known as a proxy. A proxy is a contract that is capable of wrapping any other contract, exposing its interface without having to manually implement setters and getters for it, and can upgrade it without losing state. In Solidity terms, it can be seen as a normal contract whose business logic is contained within a library, which can be swapped for a new library at any time without losing its state. The way in which the proxy links to its implementation is completely automated and encapsulated for the developer. Practically any contract can be made upgradeable with little to no change in its code. More about ZeppelinOS’s proxy mechanism can be found in the blog, and an example of how to use it can be found on GitHub.
Developing applications using ZeppelinOS is similar to developing JavaScript applications using npm. An AppManager handles an application package for each version of the application. A package is simply a directory of contracts, each of which can have one or more upgradeable proxies. The AppManager not only provides proxies for application-specific contracts, but also does so for ZeppelinOS implementations, in the form of a standard library. To see a full example of this, please visit examples/complex.
Although currently in development, ZeppelinOS aims to provide a wide set of additional features, such as developer tools, a scheduler that automates background operations within contracts, development bounties, a marketplace that facilitates communication and exchange of value between applications, and much more. All of this is described in ZeppelinOS’s whitepaper.
Utilities
EthereumJS helpeth: A Command-Line Utility
helpeth is a command-line tool for key and transaction manipulation that makes a developer’s job a lot easier.
It is part of the EthereumJS collection of JavaScript-based libraries and tools:
Usage: helpeth [command]

Commands:
  signMessage <message>                     Sign a message
  verifySig <hash> <sig>                    Verify signature
  verifySigParams <hash> <r> <s> <v>        Verify signature parameters
  createTx <nonce> <to> <value> <data>      Sign a transaction
  <gasLimit> <gasPrice>
  assembleTx <nonce> <to> <value> <data>    Assemble a transaction from its
  <gasLimit> <gasPrice> <v> <r> <s>         components
  parseTx <tx>                              Parse raw transaction
  keyGenerate [format] [icapdirect]         Generate new key
  keyConvert                                Convert a key to V3 keystore format
  keyDetails                                Print key details
  bip32Details <path>                       Print key details for a given path
  addressDetails <address>                  Print details about an address
  unitConvert <value> <from> <to>           Convert between Ethereum units

Options:
  -p, --private      Private key as a hex string                        [string]
  --password         Password for the private key                       [string]
  --password-prompt  Prompt for the private key password               [boolean]
  -k, --keyfile      Encoded key file                                   [string]
  --show-private     Show private key details                          [boolean]
  --mnemonic         Mnemonic for HD key derivation                     [string]
  --version          Show version number                               [boolean]
  --help             Show help                                         [boolean]
dapp.tools
Website: https://dapp.tools/
dapp.tools is a comprehensive suite of blockchain-oriented developer tools created in the spirit of the Unix philosophy. The tools included are:
- Dapp
-
Dapp is the basic user-facing tool, for creating new DApps, running Solidity unit tests, debugging and deploying contracts, launching testnets, and more.
- Seth
-
Seth is used for composing transactions, querying the blockchain, converting between data formats, performing remote calls, and similar everyday tasks.
- Hevm
-
Hevm is a Haskell EVM implementation with a nimble terminal-based Solidity debugger. It’s used to test and debug DApps.
- evmdis
-
evmdis is an EVM disassembler; it performs static analysis on the bytecode to provide a higher level of abstraction than raw EVM operations.
SputnikVM
SputnikVM is a standalone pluggable virtual machine for different Ethereum-based blockchains. It’s written in Rust and can be used as a binary, cargo crate, or shared library, or integrated through FFI, Protobuf, and JSON interfaces. It has a separate binary, sputnikvm-dev, intended for testing purposes, which emulates most of the JSON-RPC API and block mining.
Libraries
web3.js
web3.js is the Ethereum-compatible JavaScript API for communicating with clients via JSON-RPC, developed by the Ethereum Foundation.
npm package repository: https://www.npmjs.com/package/web3
Documentation for web3.js API 0.2x.x: http://bit.ly/2Qcyq1C
Documentation for web3.js API 1.0.0-beta.xx: http://bit.ly/2CT33p0
web3.py
web3.py is a Python library for interacting with the Ethereum blockchain, maintained by the Ethereum Foundation.
Documentation: https://web3py.readthedocs.io/
EthereumJS
EthereumJS is collection of libraries and utilities for Ethereum.
GitHub: https://github.com/ethereumjs
Website: https://ethereumjs.github.io/
web3j
web3j is a Java and Android library for integrating with Ethereum clients and working with smart contracts.
GitHub: https://github.com/web3j/web3j
Website: https://web3j.io
Documentation: https://docs.web3j.io
EtherJar
EtherJar is another Java library for integrating with Ethereum and working with smart contracts. It’s designed for server-side projects based on Java 8+ and provides low-level access and a high-level wrapper around RPC, Ethereum data structures, and smart contract access.
Nethereum
Nethereum is the .Net integration library for Ethereum.
Website: http://nethereum.com/
Documentation: https://nethereum.readthedocs.io/en/latest/
ethers.js
The ethers.js library is a compact, complete, full-featured, extensively tested MIT-licensed Ethereum library, which has received a DevEx grant from the Ethereum Foundation toward its extension and maintenance.
GitHub link: https://github.com/ethers-io/ethers.js
Documentation: https://docs.ethers.io
Emerald Platform
Emerald Platform provides libraries and UI components to build DApps on top of Ethereum. Emerald JS and Emerald JS UI provide sets of modules and React components to build JavaScript applications and websites; Emerald SVG Icons is a set of blockchain-related icons. In addition to JavaScript libraries Emerald has a Rust library to operate private keys and transaction signatures. All Emerald libraries and components are licensed under the Apache License, version 2.0.
Documentation: https://docs.etcdevteam.com
Testing Smart Contracts
There are several commonly used test frameworks for smart contract development, summarized in Smart contract test frameworks summary:
| Framework | Test language(s) | Testing framework | Chain emulator | Website |
|---|---|---|---|---|
Truffle |
JavaScript/Solidity |
Mocha |
TestRPC/Ganache |
|
Embark |
JavaScript |
Mocha |
TestRPC/Ganache |
|
Dapp |
Solidity |
ds-test (custom) |
ethrun (Parity) |
|
Populus |
Python |
pytest |
Python chain emulator |
- Truffle
-
Truffle allows for unit tests to be written in JavaScript (Mocha-based) or Solidity. These tests are run against Ganache.
- Embark
-
Embark integrates with Mocha to run unit tests written in JavaScript. The tests are in turn run against contracts deployed on TestRPC/Ganache. The Embark framework automatically deploys smart contracts, and will automatically redeploy the contracts when they are changed. It also keeps track of deployed contracts and deploys contracts only when truly needed. Embark includes a testing library to rapidly run and test your contracts in an EVM, with functions like assert.equal. The command embark test will run any test files under the directory test.
- Dapp
-
Dapp uses native Solidity code (a library called ds-test) and a Parity-built Rust library called ethrun to execute Ethereum bytecode and then assert correctness. The ds-test library provides assertion functions for validating correctness and events for logging data in the console.
The assertion functions include:
assert(bool condition)
assertEq(address a, address b)
assertEq(bytes32 a, bytes32 b)
assertEq(int a, int b)
assertEq(uint a, uint b)
assertEq0(bytes a, bytes b)
expectEventsExact(address target)
The logging commands will log information to the console, making them useful for debugging:
logs(bytes)
log_bytes32(bytes32)
log_named_bytes32(bytes32 key, bytes32 val)
log_named_address(bytes32 key, address val)
log_named_int(bytes32 key, int val)
log_named_uint(bytes32 key, uint val)
log_named_decimal_int(bytes32 key, int val, uint decimals)
log_named_decimal_uint(bytes32 key, uint val, uint decimals)
- Populus
-
Populus uses Python and its own chain emulator to run contracts written in Solidity. Unit tests are written in Python with the pytest library. Populus supports writing contracts specifically for testing. These contract filenames should match the glob pattern Test*.sol and be located anywhere under the project tests directory, tests.
On-Blockchain Testing
Although most testing shouldn’t occur on deployed contracts, a contract’s behavior can be checked via Ethereum clients. The following commands can be used to assess a smart contract’s state. These commands should be typed at the geth terminal, although any web3 console will also support them.
To get the address of a contract at txhash, use:
eth.getTransactionReceipt(txhash);
This command gets the code of a contract deployed at contractaddress; this can be used to verify proper deployment:
eth.getCode(contractaddress)
This gets the full logs of the contract located at the address specified in options, which is helpful for viewing the history of a contract’s calls:
eth.getPastLogs(options)
Finally, this command gets the storage located at address with an offset of position:
eth.getStorageAt(address, position)
Ganache: A Local Test Blockchain
Ganache is a local test blockchain that you can use to deploy contracts, develop your applications, and run tests. It is available as a desktop application (with a graphical user interface) for Windows, macOS, and Linux. It is also available as a command-line utility called ganache-cli. For more details and installation instructions for the Ganache desktop application, see https://truffleframework.com/ganache.
The ganache-cli code can be found at https://github.com/trufflesuite/ganache-cli/.
To install the command line ganache-cli, use npm:
$ npm install -g ganache-cli
You can use ganache-cli to start a local blockchain for testing as follows:
$ ganache-cli \
  --networkId=3 \
  --port="8545" \
  --verbose \
  --gasLimit=8000000 \
  --gasPrice=4000000000;
A few notes on this command line:
-
❏ Check the
--networkIdand--portflag values match your configuration in truffle.js. -
❏ Check the
--gasLimitflag value matches the latest mainnet gas limit (e.g., 8,000,000 gas) shown at https://ethstats.net to avoid encountering “out of gas” exceptions unnecessarily. Note that a--gasPriceof 4000000000 represents a gas price of 4 gwei. -
❏ You can optionally enter a
--mnemonicflag value to restore a previous HD wallet and associated addresses.